Bringing Esbonio to the Browser

The Approach
I’m sure there will be plenty of problems that need to be solved in order to make this work, but my gut instinct is that it is possible. First of all there is Pyodide which, if you’ve not come across it before, is the Python interpreter, (most of) the standard library and the “scientific stack” compiled down to WebAssembly which can then be executed in a browser.
Also, as part of the vscode.dev announcement stream they demo’d the vscode-pyodide extension which builds on Pyodide and JupyterLite to allow for executable Python notebooks from a web browser! This proves that it’s possible to run Python code via Pyodide from within VSCode running in a web browser.
All that’s left to do is “just” to connect the dots! 😃
Of course, the devil is in the details and there’s going to be all sorts of gotchas on the way to making this work. But I think a rough plan of attack would be to tackle the following steps.
Setup a basic VSCode extension that runs in a browser composed of placeholder language client and server components.
Expand on the language server to include a server implemented with pygls (the library that Esbonio is built on).
Ensure Sphinx works in a browser context. I’m fairly sure Sphinx is a pure Python project so in theory should “just work” but file I/O could prove a challenge.
Bring all of the above together and get the Esbonio language server running.
Ship it!
The Setup
Using the lsp-web-extension-sample as a guide, the remainder of this blog post is going to be dedicated to setting up the rough structure of a web-enabled lsp VSCode extension. You can browse the completed extension here.
But before we get too far into it, it’s probably worth zooming out a bit and roughly sketch out all the pieces and how they fit together.
Architecture
At the core we have two components, a language client (e.g. our VSCode extension) and a language server (e.g. the esbonio Python package) which communicate by sending messages between each other.
In a web browser context, the client runs as a Web Worker that it managed by VSCode’s Extension Host. The client in turn manages its own Web Worker which hosts the language server. Hopefully, this server web worker will eventually contain an instance of Pyodide running Esbonio managed by a bit of JavaScript glue code.
Writing the Language Client
The language client code is pretty straightforward as all the heavy lifting is done by the vscode-languageclient library.
$ npm install --save vscode-languageclient
The client code is pretty much identical to code found in the sample extension I used as reference. All that we have to do it tell the language client which documents we’re interested in
const clientOptions: LanguageClientOptions = {
    documentSelector: [
        { scheme: "file", language: "plaintext" },
    ],
    outputChannelName: "Hello Language Server",
}
and since we’re building this for the web, we need to start a web worker that hosts the language server and pass that to the client also.
const path = Uri.joinPath(context.extensionUri, "dist/server.js")
const worker = new Worker(path.toString())

const client = new LanguageClient("hello-lsp-web", "Hello LSP", clientOptions, worker)
context.subscriptions.push(client.start())

client.onReady().then(() => {
    console.log("hello-lsp-web server is ready")
})
Writing the Language Server
The goal of this post is just to get the simplest end-to-end concept working so the “language server” in this case does barely anything except prove that
We can communicate with the client
We can load Pyodide and execute some Python code
Communication with web workers is achieved through sending messages, so to handle
incoming messages from the client we create an onmessage event handler and use the
postMessage to send our responses.
To prove that the communication works, our “language server” handles the initialize
request to establish the session, but ignores everything else.
onmessage = async (event) => {
    console.log(`Client message:`, event.data)

    if (event.data.method === "initialize") {
        postMessage({
            jsonrpc: "2.0",
            id: event.data.id,
            result: {
                serverInfo: { name: "Hello, LSP" },
                capabilities: {}
            }
        })
    }
With the communication taken care of, we can focus on setting up Pyodide. Adapting one of the getting started examples from the Pyodide documentation and using the importScripts function that’s available to web workers it’s relatively straightforward to load Pyodide from a CDN and initialize it.
importScripts("https://cdn.jsdelivr.net/pyodide/v0.18.1/full/pyodide.js")

async function initPyodide() {

    console.log("Initing pyodide.")

    /* @ts-ignore */
    let pyodide = await loadPyodide({
        indexURL: "https://cdn.jsdelivr.net/pyodide/v0.18.1/full/"
    })

    return pyodide
}

const pyodideReady = initPyodide()
Pyodide isn’t exactly a small component to download and especially when we start
pulling in packages, will take some time to initialize. Using a global pyodideReady
promise we can make any code that depends on pyodide wait until it’s ready to use.
let pyodide = await pyodideReady
console.log(pyodide.runPython("import sys;sys.version"))
Packaging for the Web
You may have noticed that the code above was written in TypeScript which needs to be compiled into JavaScript in order to run in the browser. Additionally, due to the way VSCode handles web extensions all the code that comprises the language client (including the dependencies!) needs to be bundled into a single JavaScript file.
To do this we’ll use webpack along with a few other tools.
$ npm install --save-dev webpack webpack-cli typescript ts-loader @types/vscode path-browserify
Like most of this setup, the webpack configuration was based on the lsp-web-extension-sample where we export 2 configurations, one for the client and one for the server.
const clientConfig = {
   target: 'webworker'
   entry: {
      client: './src/client'
   },
   resolve: {
      fallback: {
         path: require.resolve('path-browserify')
      }
      ...
   },
   ...,
   externals: {
      vscode: 'commonjs vscode'
   }
}

const serverConfig = {
   target: 'webworker',
   entry: {
      server: './src/server'
   },
   ...
}

module.exports = [clientConfig, serverConfig]
I’ve omitted most of the more standard configuration fields for brevity but you can look at the code for full details though there are a few things worth mentioning
Both client and server will be running in web workers so we need to make sure we tell webpack to
target: webworkerThe client depends on the VSCode API but it’s not available at build time, so we use the
externalsfield to tell webpack to translate anyimport {} from 'vscode'statements into a CommonJS import.Node libraries like
pathare not available in the browser, so we use thefallbackfield to replace calls to thepathlibrary, will calls to the path-browserify library which implements the same API, but works within the browser.
Finally to invoke webpack we can add a couple of scripts to our package.json for
convenience.
"scripts": {
   "compile": "webpack",
   "watch": "webpack --watch"
}
Trying it out
Note
I don’t fully understand how this section works, thankfully the VSCode devs figured out these steps and wrote them up
The last step is to actually try to run this extension in the web version of VSCode and
see if it works. Unfortunately testing a web extension is not as straightforward as a
desktop one, but with a few npm commands ✨magic happens✨ and the web version
of VSCode is able to install our extension from a simple web server running on
localhost
First we start by adding a few more scripts to our package.json
"scripts": {
   "serve": "npx serve --cors -l 5000",
   "tunnel": "npx localtunnel -p 5000"
}
Now assuming that we’ve already run npm run watch or npm run compile from the
previous section, we run both the serve and tunnel scripts from two separate
terminals
$ npm run serve

> hello-lsp-web@ serve blog/code/hello-lsp-web
> npx serve --cors -l 5000

npx: installed 88 in 6.613s

┌──────────────────────────────────────────────────┐
│                                                  │
│   Serving!                                       │
│                                                  │
│   - Local:            http://localhost:5000      │
│   - On Your Network:  http://192.168.0.31:5000   │
│                                                  │
│   Copied local address to clipboard!             │
│                                                  │
└──────────────────────────────────────────────────┘
$ npm run tunnel

> hello-lsp-web@ tunnel blog/code/hello-lsp-web
> npx localtunnel -p 5000

npx: installed 22 in 3.043s
your url is: https://xxxx-yyyy-zzzz.loca.lt
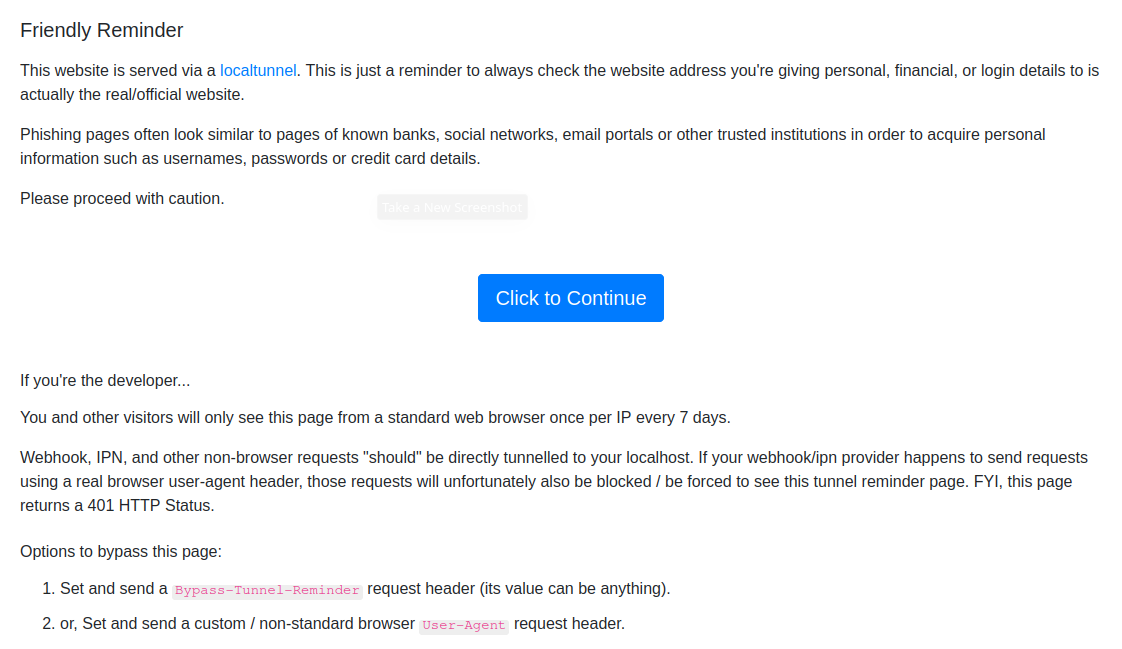
Then to enable the tunnel we have to visit the https://xxxx-yyyy-zzz.loca.lt
URL printed by the tunnel script, which takes us to a “Friendly Reminder” screen
and we click the Click to Continue button.
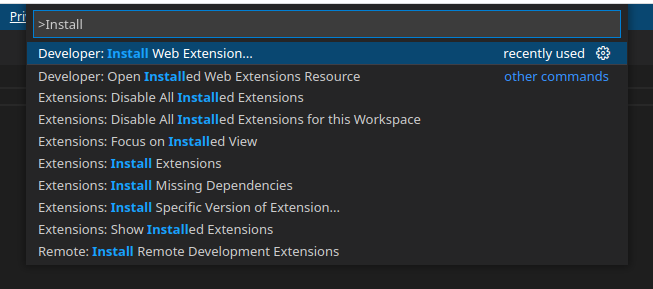
Now we can finally open the web version of VSCode itself, open the command palette
with F1 and pick the Developer: Install Web Extension... command. When asked
for the URL to install from, we paste the URL given to us from the tunnel script
above.
With any luck, VSCode should install the extension show it in the installed extensions
list in the Extensions tab. All that’s left us to do is actually test the extension!
As you can probably guess from the code we wrote above, there’s actually not much for
us to test. However, we can open the dev tools as you would on any other website and
create a file test.txt if everything works as expected, we should see the following
messages printed to console.
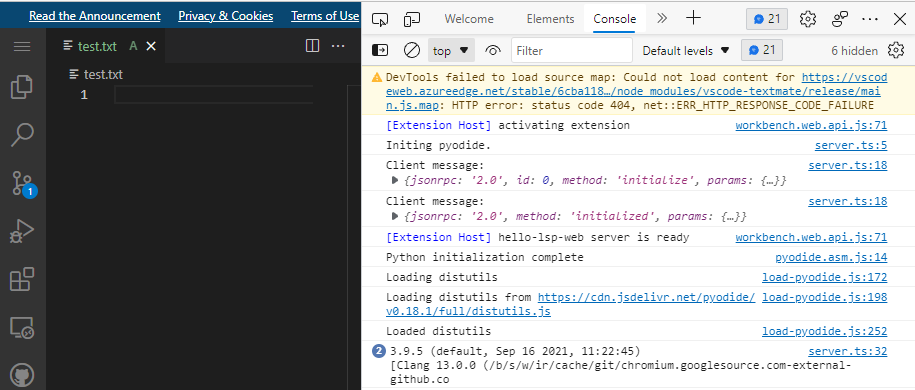
Success!
Next Steps
That’s it! We have a very simple proof of concept web extension setup where the language server component is able to run Python code and communicate with the client. In the next post I hope to be able to stand up a simple pygls language server and have it work with the online version of VSCode 🤞